Have some questions for us? This weeks blog post we answer all of your questions and more. Enjoy!
- Cedar Hollow, Fox Field and Westbury International in London
- Phase 2 in Drayton
- Grasslands and Huron Village in Kitchener
- Laurentian Village in Kitchener
- Clair Hills in Waterloo
- Custom homes in Cambridge, Waterloo, St. George, Scotland, New Hamburg, North Dumfries, Castlewood Place, Clair Meadows, Devil’s Creek Country Club Estates
A: Sunlight Heritage Homes is a registered builder with the Tarion Warranty Corporation. Among our many achievements, we have maintained the highest rating of excellence since our inception.
A: We build a variety of homes to suit our homeowners’ needs and have a large supply of plans that include bungalows, split levels, two-storey, back splits and walkouts. You name it – we can build it!
A: By carefully selecting premium products and professionals, Sunlight Heritage Homes provides you with the assurance that your home is built with the quality you expect. For every home we build, we include the following warranties:
- Sunlight Heritage Homes Limited One Year Warranty on defects for workmanship and materials.
- Sunlight Heritage Homes Limited Two Year Warranty on water penetration above or below grade and defects in materials or workmanship of the electrical, plumbing and heating delivery and distribution systems.
- Tarion Seven Year Warranty (Purchaser paid) on major structural defects and septic systems.
A: As each home is different and tastes vary, it is best to refer to your Agreement of Purchase and Sale to determine what is included in a Sunlight Heritage Home.
A: Home prices include the GST and take into consideration potential rebates. When referring to our price list, please keep this in mind; not all builders include the GST in their list prices. Please also note that rebates are based on specific criteria outlined by Canada Customs and Revenue Agency.
A: An Agreement of Purchase and Sale is a Legal contract between you, as the Purchaser, and Sunlight Heritage Homes Limited as the Builder/Vendor. It sets out in writing the details of the home Sunlight Heritage Homes Limited will be building for you. It will also have attached to it a number of schedules dealing with several aspects included with the purchase of your new home. These schedules form a part of the agreement and will include, but are not limited to, any conditions of the agreement (i.e. financing, approval of the plans by a third party, solicitor approval etc.,) the payment structure of the agreement and any restrictions that run with the land that you should be aware of. (i.e. limitations on clotheslines, commercial or non-operable vehicles on the lot, alterations to the grading etc.). Your Sales Associate will be happy to review these documents with you and answer any questions you may have. However this is not meant as a substitute for Purchasers discussing the agreement with their solicitor.
A: Sunlight Heritage Homes Limited is happy to forward our agreements to your solicitor prior to a purchaser signing them. In addition to this, the main body of our agreements contains a clause making all our agreements conditional upon the Purchasers solicitor’s approval. In this way should a purchaser wish to sign the agreement first, because of time constraints they may have, such as being in from out of town and have to get back, they can rest comfortably knowing that they still have the added protection of their agreement not becoming firm and binding until approved by their solicitor.
A: The developer is responsible for the services to your home, for example, sewers, water mains, roads, street lighting. The developer enters into an agreement with the municipality to deliver such items to the new subdivision.
A: Prices vary with each community. Our Sales Associate will be pleased to review our price ranges with you. Please keep in mind that changes made to a home may increase the price of a home. We will guide you through this process, so you are comfortable with your selections and your budget.
A: Lot sizes vary with each community. Our Sales Associate will be pleased to review our lot sizes with you.
A: Depending on the community, lot premiums may apply. Our Sales Associate will be pleased to review lot premiums with you.
A: Absolutely! In addition to our development sites Sunlight Heritage Homes is proud to offer our customers our full range Custom Home Building Services.
A: We recommend that you discuss your options with our Sales Associate. In such an instance, Sunlight Heritage Homes may enter into an agreement with you that is conditional upon the sale of your current home. We do not proceed with construction until the waiving (or removal) of all conditions contained in your Agreement of Purchase and Sale and the contract becomes firm.
A: If you are interested in reserving a particular lot, we encourage you to do so. Without a reservation, another interested party may choose the lot you are considering. The reservation amount is dependent on the community. Please note that this amount is applied to your first deposit upon the signing of a purchase and sale agreement.
A: Sunlight Heritage Homes is proud of its working relationship with a number of financial institutions and will be happy to assist you with your financing if requested. In addition often the institutions we work with offer Sunlight Heritage Homes’ customers preferred rates with prolonged commitment periods to accommodate construction time frames. Please ask your Sales Associate for details.
A: While we have chosen plans that we think will suit the community we are building, all can be modified to suit your needs. Each neighborhood will be distinguished for its character. To accomplish this, we avoid repetition in elevation designs and try to prevent side-by-side or across the street replication. Please check with our Sales Associates to determine if the lot you are considering has any pre-selections or limitations.
A: We consider streetscape to be very important. Generally, we do not provide pre-determined colour schemes. Exterior colours will be selected and reviewed in consultation with our Designer to prevent side-by-side or across the street replication. Please check with our Sales Associates to determine if the lot you are considering has any pre-selections or limitations.
A: Depending upon the community you are considering a model home may be available for you to view. From time to time as we progress through our New Home Sites or as we move from a completed site to a new one a model home may not be available for viewing. Please contact our Sales Associate to determine if this is the case as you prepare to make your decisions. In addition we may be able to offer you an opportunity to view a home already under construction. However, due to insurance and Health and Safety Regulations we must insist that you are accompanied by a Sunlight Heritage Homes representative and that all Health and Safety requirements are adhered to.
A: Due to Insurance and Health and Safety Regulations all site visits must be pre-arranged with a Sunlight Heritage Homes representative. Green tab Steel toed work boots and Hard Hat must be worn at all times. In addition to this being for your safety we are also available to answer any questions as they arise.
A: By all means feel free to take photos either from the street or when visiting the site accompanied by your Sunlight Heritage Homes Representative.
A: By taking the appropriate measures, we can most certainly build in the winter.
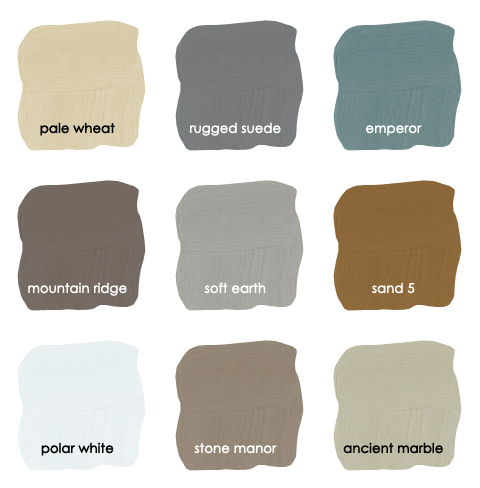
A: You will choose exterior/interior colours and materials from our samples. Our samples are available for viewing in our Sales Centre. If there is something in particular you like that we do not have, if it is within our means and your budget, every effort will be made to obtain it for you.
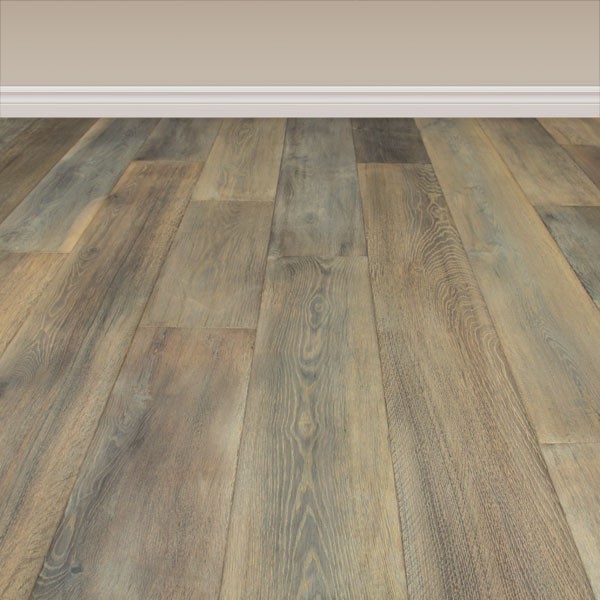
A: The old saying different strokes for different folks” was never more appropriate than when it comes to picking out floor coverings for you home. You should let your lifestyle and the make up of your family determine the types of floor coverings that will be used in different locations in the home. For instance, active families, with small children and pets, should look to the most durable floor coverings, especially in high traffic areas.
A: Carpet is one of the most frequently upgraded items in new homes, and for good reason. At the time of initial purchase, the buyer has the best ever deal on upgraded carpet as most builder’s will credit the cost of the standard carpeting toward the cost of the upgraded flooring.
A: Neutral colors are strongly recommended as they will match the furnishings you have now …and those you may choose in the future. Moreover, neutral colors may be a big help in facilitating the rapid sale of your home when it comes time to move up. Many a home sale has been nixed by an overbearing color that won’t go with the prospective purchaser’s furnishings. Additionally, lighter colors make rooms feel larger.
A: It is a good idea to start with a list of all the things you want in your new home and then prioritize them before you begin the task of reconciling with the total amount you want to spend.
A: When building a home, we take into account such things as special order requirements, materials and trade availability. As such, we set your closing date accordingly.
A: We recognize the importance of your closing date. Sunlight Heritage Homes makes every effort to foresee potential delays in order to rectify them before they occur. We intend to continue this practice, but if for any reason there is a delay you will be notified as soon as we become aware of it.
A: In some locations these items are included in your agreement of purchase and sale while in others they are not. Please consult with your Sales Associate to determine which is applicable for the location you have chosen. For those locations where they are included these items are usually dealt with in spring or early fall.
A: A homeowner may install a pool, a fence or deck as long as the Developer has given written approval and/or as long as it is in accordance with the Municipality’s by-laws and the proper permits are obtained. However, if you intend to do any of the above in future, it is best to check with us, as there may be restrictive covenants in your Purchase and Sale agreement.
A: We are committed to our homeowners. In fact, we have a special section in our Homeowner guide to deal with this issue. For more details, our Sales Associate will be pleased to review our procedures.
A: While this list is certainly not exhaustive, here are some of the costs you may incur:
- Modifications and Upgrade charges
- Interim Financing Costs
- Legal Costs (usually includes solicitor and administration fees, land survey, title charges, etc.)
- Ontario Land Transfer Tax
- Tarion Warranty Corporation Fee
- Realty Taxes
- Telephone and Utility company hook-up and account set-up fees
- Moving company charges